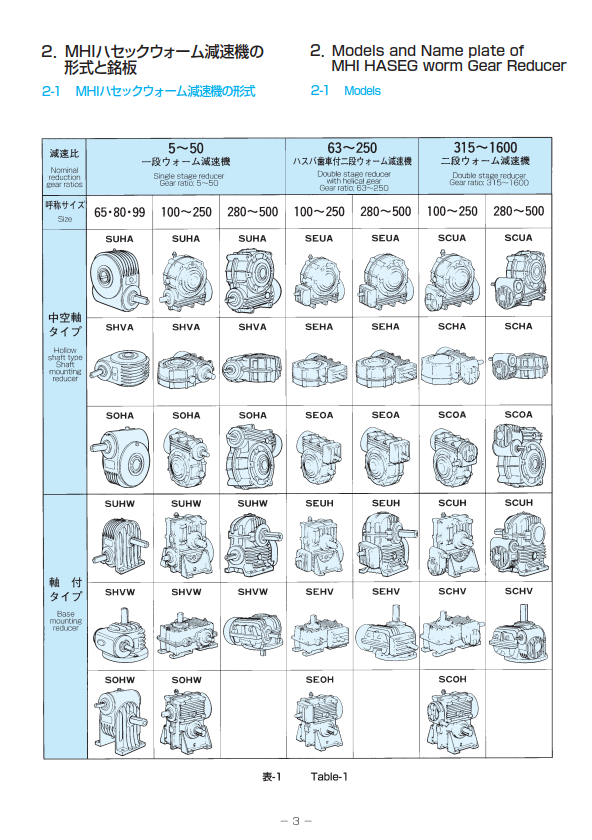
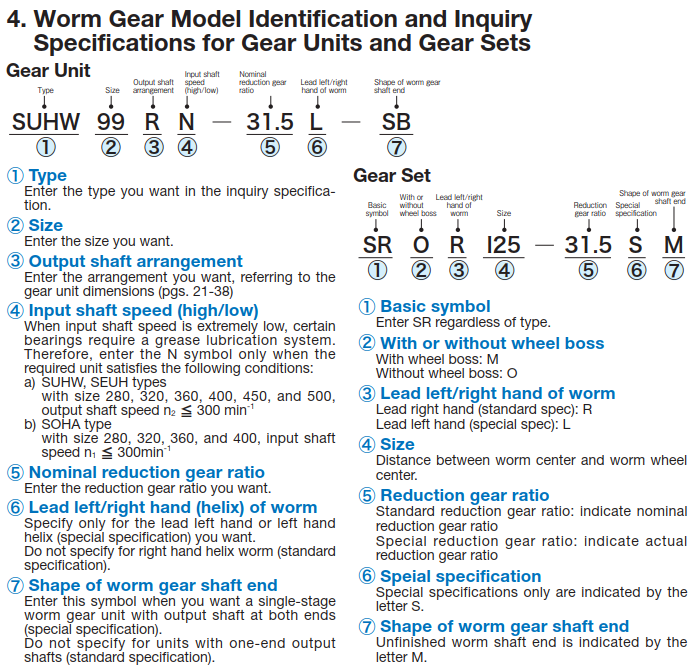
Installation and Setup for MHI HASEG Worm Gear Reducer SUHA65R-12.5
Proper installation and setup of the MHI HASEG Worm Gear Reducer SUHA65R-12.5 are crucial for ensuring optimal performance and longevity. Follow these guidelines for a successful installation:
1. Pre-Installation Preparation
-
Read the Manual: Before beginning installation, thoroughly read the user manual and installation instructions provided with the gear reducer. This document contains specific details and safety information.
-
Verify Components: Ensure all components are present and in good condition. This includes the gear reducer, mounting hardware, seals, and any accessories.
-
Work Area: Prepare a clean and well-lit work area. Ensure there is sufficient space for handling the gear reducer and necessary tools.
2. Equipment and Tools
-
Tools Required: Gather necessary tools such as wrenches, screwdrivers, alignment tools, and any special tools recommended in the manual.
-
Safety Equipment: Use appropriate personal protective equipment (PPE) such as gloves and safety glasses to ensure safety during installation.
3. Mounting the Gear Reducer
-
Mounting Surface: Ensure the mounting surface is clean, flat, and free of debris. The surface should be capable of supporting the weight of the gear reducer.
-
Alignment: Align the gear reducer accurately with the driven equipment (e.g., motor, machine). Proper alignment is critical to prevent excessive wear and operational issues.
-
Securing: Use the provided mounting hardware to secure the gear reducer to the mounting surface. Tighten bolts and fasteners to the specified torque values as outlined in the manual.
4. Connecting to the Motor
-
Coupling: If applicable, install the coupling between the gear reducer and the motor. Ensure the coupling is properly aligned to prevent vibrations and damage.
-
Fastening: Secure the gear reducer to the motor using appropriate fasteners. Check alignment and adjust as necessary.
5. Lubrication
-
Lubrication Check: Verify that the gear reducer is properly lubricated. Follow the lubrication guidelines in the manual, including the type of lubricant and the amount required.
-
Filling: If necessary, fill the gear reducer with the recommended lubricant. Use clean, high-quality lubricant to avoid contamination.
6. Electrical Connections
-
Wiring: Connect any electrical components or sensors according to the wiring diagrams provided in the manual.
-
Inspection: Check all electrical connections for proper installation and ensure there are no loose wires or exposed connections.
7. Initial Start-Up
-
Inspection: Before starting the gear reducer, inspect all connections, fasteners, and lubrication levels to ensure everything is correctly installed.
-
Test Run: Perform an initial test run to check for proper operation. Monitor the gear reducer for any unusual noises, vibrations, or overheating.
-
Adjustment: Make any necessary adjustments to ensure smooth operation and optimal performance.
8. Post-Installation Checks
-
Operation: After installation, monitor the gear reducer’s performance during normal operation. Check for proper function and address any issues promptly.
-
Maintenance Schedule: Follow the recommended maintenance schedule provided in the manual to ensure the gear reducer remains in good condition.
9. Documentation
-
Record Keeping: Document the installation process, including any adjustments made and observations during the test run. Keep this information for future reference and maintenance.
-
Warranty Registration: If required, register the gear reducer for warranty coverage as per the instructions in the manual.
Summary
The installation and setup of the MHI HASEG Worm Gear Reducer SUHA65R-12.5 involve careful preparation, accurate alignment, proper lubrication, and thorough testing. By following these guidelines and consulting the user manual, you can ensure a successful installation that supports optimal performance and longevity of the gear reducer.